Windows App SDK Desktop App with native interop - Part 2
As the Windows App SDK moves beyond release 1.0 and begins to expand it's capability, I thought it was time to start exploring it more fully. In this post I will explore the integration of a native API into a Windows App SDK. You can learn more about Windows App SDK here: Windows App SDK
In this second part, I will extend the implementation of the native API and add a UI.
The source code for the WinApp can be found here: HemanWinUI Part 2.
Objective
The heman api readme outlines an example that produces 5 images and joins them into a single horizontal "film strip" image similar to:
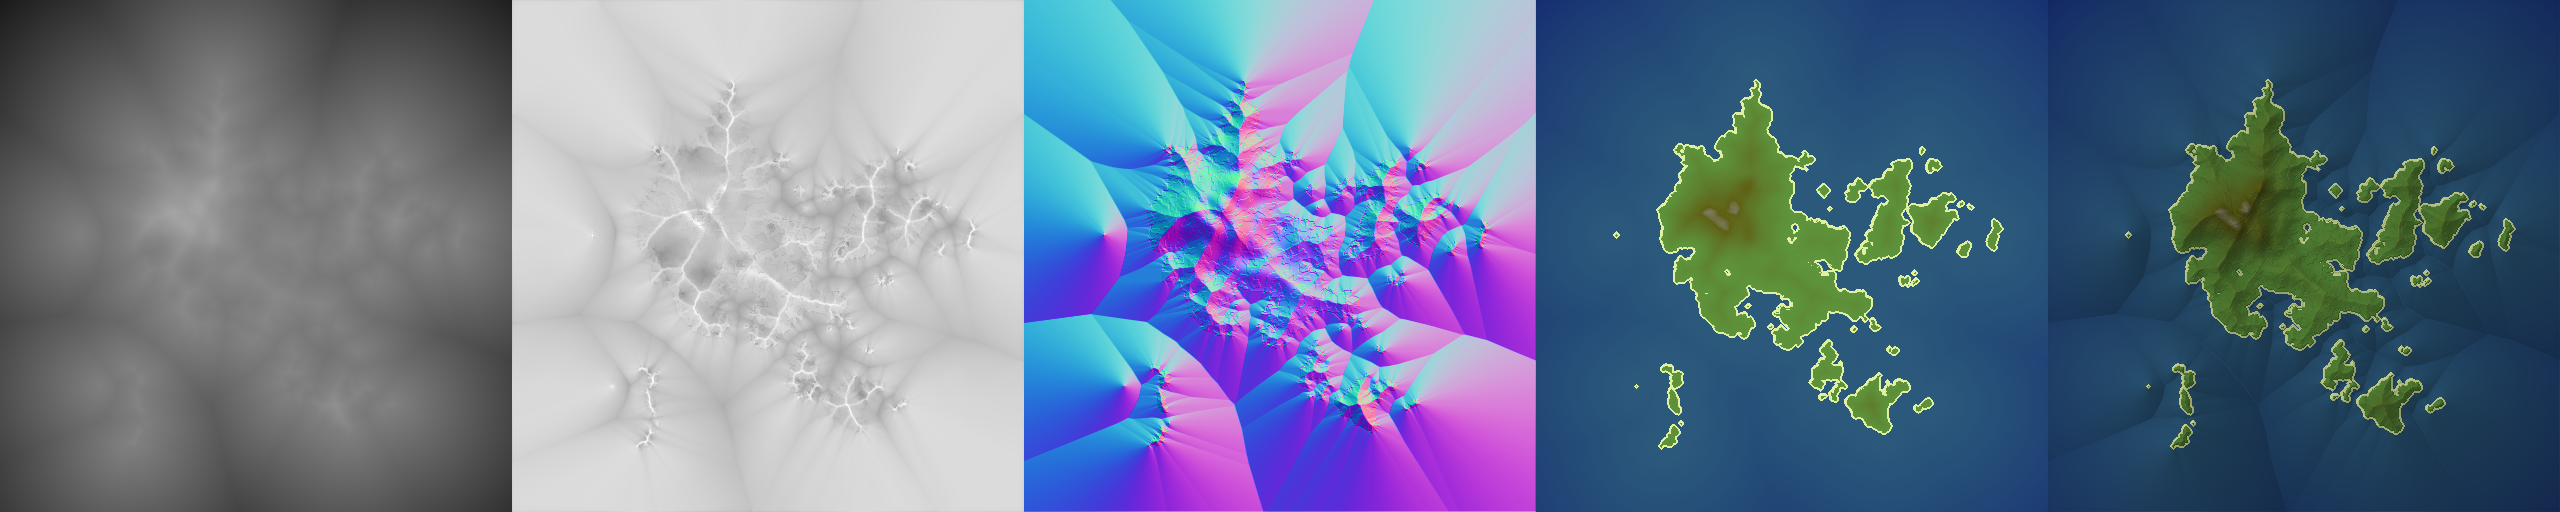
The readme provides and high-level view of the C code to generate the film strip, but the actual code is a little more extensive:
static void test_lighting()
{
    heman_image* grad = heman_color_create_gradient(
        256, COUNT(cp_colors), cp_locations, cp_colors);

    // Generate the heightmap.
    heman_image* hmap = heman_generate_island_heightmap(SIZE, SIZE, time(0));
    heman_image* hmapviz = heman_ops_normalize_f32(hmap, -0.5, 0.5);

    // Compute ambient occlusion.
    heman_image* occ = heman_lighting_compute_occlusion(hmap);

    // Create a normal map.
    heman_image* norm = heman_lighting_compute_normals(hmap);
    heman_image* normviz = heman_ops_normalize_f32(norm, -1, 1);

    // Create an albedo image.
    heman_image* albedo = heman_color_apply_gradient(hmap, -0.5, 0.5, grad);
    heman_image_destroy(grad);

    // Perform lighting.
    float lightpos[] = {-0.5f, 0.5f, 1.0f};
    heman_image* final =
        heman_lighting_apply(hmap, albedo, 1, 1, 0.5, lightpos);

    heman_image* frames[] = {0, 0, normviz, albedo, final};
    frames[0] = heman_color_from_grayscale(hmapviz);
    frames[1] = heman_color_from_grayscale(occ);
    heman_image* filmstrip = heman_ops_stitch_horizontal(frames, 5);
    hut_write_image(OUTFOLDER "filmstrip.png", filmstrip, 0, 1);
    heman_export_ply(hmap, OUTFOLDER "heightmap.ply");
    heman_export_with_colors_ply(hmap, final, OUTFOLDER "colors.ply");
    heman_image_destroy(frames[0]);
    heman_image_destroy(frames[1]);
    heman_image_destroy(hmap);
    heman_image_destroy(hmapviz);
    heman_image_destroy(occ);
    heman_image_destroy(norm);
    heman_image_destroy(normviz);
    heman_image_destroy(albedo);
    heman_image_destroy(final);
}
Migrating this code over to C# will look remarkably similar.
Analyzing the create gradient function call
The first function call we will look at migrating is the following C code:
heman_image* grad = heman_color_create_gradient(256, COUNT(cp_colors), cp_locations, cp_colors);
So there is a whole bunch of things going on here. We can see that the function returns a pointer to the heman_image structure, has a dependency on a COUNT macro (uppercase function names are usually macros), cp_locations and cp_colors. The function definition looks like:
// Create a 1-pixel tall, 3-band image representing a color gradient that lerps
// the given control points, in a gamma correct way.  Each control point is
// defined by an X location (one integer each) and an RGB value (one 32-bit
// word for each color).
heman_image* heman_color_create_gradient(int width, int num_colors,
    const int* cp_locations, const heman_color* cp_colors);
Let's take a look at the heman_image structure:
// An "image" encapsulates three integers (width, height, number of bands)
// and an array of (w * h * nbands) floats, in scanline order.  For simplicity
// the API disallows struct definitions, so this is just an opaque handle.
typedef struct heman_image_s heman_image;

struct heman_image_s {
    int width;
    int height;
    int nbands;
    HEMAN_FLOAT* data;
};

// Image values in heman are always floating point, but clients may
// choose either 32-bit floats or 64-bit floats at compile time.
#ifdef USE_DOUBLE_PRECISION
#define HEMAN_FLOAT double
#else
#define HEMAN_FLOAT float
#endif
Navigating the typedef and macro definition of HEMAN_FLOAT (we are using the single precision float type) we can see the structure is pretty straightforward. The only challenging aspect is that data is just a pointer to an unknown number of floats... however, if I review the remaining code I can see that the members of the heman_image structure are never accessed at this level, so we could just pass around a pointer to the struct without ever marshalling the underlying data to a C# type. If we were to implement the struct in C#, it would look similar to the code below. Notice the use of IntPtr that can be used to represent a pointer to any data type (it isn't a "pointer to an int value", it is "an int value that may hold a pointer or handle").
[StructLayout(LayoutKind.Sequential)]
public struct HemanImage
{
    public int Width;
    public int Height;
    public int NBands;
    public IntPtr data; // Array of floats which we don't need to access
}
Moving on to the width and num_colors - these are easy to deal with, they are just int values.
heman_image* heman_color_create_gradient(int width, int num_colors,
    const int* cp_locations, const heman_color* cp_colors);
The next parameter, cp_locations (control point locations), expects a pointer to an array of int values, and the final parameter, cp_colors (control point colors), expects a pointer to an array of heman_color values.
The cp_locations definition looks like this in C:
// Create a reasonable ocean-to-land color gradient.
int cp_locations[] = {
    000,  // Dark Blue
    126,  // Light Blue
    127,  // Yellow
    128,  // Dark Green
    160,  // Brown
    200,  // White
    255,  // White
};
This maps easily to C#:
int[] cpLocations =
    {
        000,  // Dark Blue
        126,  // Light Blue
        127,  // Yellow
        128,  // Dark Green
        160,  // Brown
        200,  // White
        255,  // White
    };
The cp_colors definition looks like this in C:
heman_color cp_colors[] = {
    0x001070,  // Dark Blue
    0x2C5A7C,  // Light Blue
    0xE0F0A0,  // Yellow
    0x5D943C,  // Dark Green
    0x606011,  // Brown
    0xFFFFFF,  // White
    0xFFFFFF,  // White
};

typedef unsigned int heman_color;
We can see that heman_color is an unsigned int - so we can map that easily to C#. The C# code will look like:
uint[] cpColors =
    {
        0x001070,  // Dark Blue
        0x2C5A7C,  // Light Blue
        0xE0F0A0,  // Yellow
        0x5D943C,  // Dark Green
        0x606011,  // Brown
        0xFFFFFF,  // White
        0xFFFFFF,  // White
    };
However, the parameters are pointers to these two arrays - how do we create those pointers? Well, there is a challenge regarding data in a .NET app - it can move around, or be grabage collected, which can be cataclysmic if it occurs after the original address is passed to native libraries. So, in order to prevent this, we need to leverage GCHandle to pin the array in memory and obtain a pointer to it. The standard approach to that in C# is similar to the following:
int[] array = { 1, 2, 3, 4, 5 };

GCHandle handle = GCHandle.Alloc(array, GCHandleType.Pinned);
try
{
    IntPtr pointer = handle.AddrOfPinnedObject();

    // do something with the pointer
}
finally
{
    if (handle.IsAllocated)
    {
        handle.Free();
    }
}
Notice that we allocate a handle and pin the array, so it isn't moved or collected, then we create an IntPtr that holds the address of the array. finally we ensure the handle is freed so that the memory can be collected.
So, after all of this analysis, we can say the following about the function the C function definition below:
heman_image* heman_color_create_gradient(int width, int num_colors,
    const int* cp_locations, const heman_color* cp_colors);
In C# this function will:
- Return an
IntPtr - Take an
intargument forwidth - Take an
intargument fornum_colors - Take an
IntPtrfor the address ofcp_locations - Take an
IntPtrfor the address ofcp_colors
This is what the function definition will look like in C#:
static extern IntPtr heman_color_create_gradient(int width, int num_colors, IntPtr cp_locations, IntPtr cp_colors);
To use this with the heman.dll we added to the project, we need to add the DllImport attribute, so overall it will look like this:
[DllImport("heman.dll")]
internal static extern IntPtr heman_color_create_gradient(int width, int num_colors, IntPtr cp_locations, IntPtr cp_colors);
To migrate all of the remaining functions, you would repeat this process. I save specific remarks on particular functions for later in the tutorial.
Refer to Type marshaling for information on how map native types to .NET types, and vice versa. More information about marshalling, etc. can be found below:
- Customize structure marshaling
- Customizing parameter marshaling
- Native interoperability best practices
- Charsets and marshaling
Updating the NativeMethods class
-
In Visual Studio, open the HemanWinUI solution.
-
Open the HemanApi class and locate the NativeMethods class. Replace the definition with the following:
private static class NativeMethods { const string DLL = "heman.dll"; [DllImport(DLL)] internal static extern int heman_get_num_threads(); [DllImport(DLL)] internal static extern IntPtr heman_color_create_gradient(int width, int num_colors, IntPtr cp_locations, IntPtr cp_colors); [DllImport(DLL)] internal static extern IntPtr heman_generate_island_heightmap(int width, int height, int seed); [DllImport(DLL)] internal static extern IntPtr heman_ops_normalize_f32(IntPtr source, float minval, float maxval); [DllImport(DLL)] internal static extern IntPtr heman_lighting_compute_occlusion(IntPtr heightmap); [DllImport(DLL)] internal static extern IntPtr heman_lighting_compute_normals(IntPtr heightmap); [DllImport(DLL)] internal static extern IntPtr heman_color_apply_gradient(IntPtr heightmap, float minheight, float maxheight, IntPtr gradient); [DllImport(DLL)] internal static extern void heman_image_destroy(IntPtr img); [DllImport(DLL)] internal static extern IntPtr heman_lighting_apply(IntPtr heightmap, IntPtr colorbuffer, float occlusion, float diffuse, float diffuse_softening, IntPtr light_position); [DllImport(DLL)] internal static extern IntPtr heman_color_from_grayscale(IntPtr gray); [DllImport(DLL)] internal static extern IntPtr heman_ops_stitch_horizontal(IntPtr images, int count); [DllImport(DLL, CharSet = CharSet.Ansi)] internal static extern void hut_write_image(string filename, IntPtr img, float minv, float maxv); } [StructLayout(LayoutKind.Sequential)] public struct HemanImage { public int Width; public int Height; public int NBands; public IntPtr data; // Array of floats which we don't need to access } -
Take a quick look at the function definitions - they are all very similar to the earlier discussion. You may note that where there are strings, the is a
CharSet = CharSet.Ansiproperty added toDllImportto ensure that the string values are marshalled correctly.
Adding the example implementation
-
Navigate to the definition of the HemanApi class:
internal class HemanApi { -
Beneath this, add the following:
const int Size = 512;

static readonly int[] cpLocations =
    {
        000,  // Dark Blue
        126,  // Light Blue
        127,  // Yellow
        128,  // Dark Green
        160,  // Brown
        200,  // White
        255,  // White
    };

static readonly uint[] cpColors =
    {
        0x001070,  // Dark Blue
        0x2C5A7C,  // Light Blue
        0xE0F0A0,  // Yellow
        0x5D943C,  // Dark Green
        0x606011,  // Brown
        0xFFFFFF,  // White
        0xFFFFFF,  // White
    };

static readonly float[] lightPos = { -0.5f, 0.5f, 1.0f };
These are basically the same arrays as discussed earlier (with the addition of
lightPos, but essentially the same), just marked asstaticandreadonly. -
Add the following method that will be used to clean up handles:
private static void FreeHandle(GCHandle handle) { if (handle.IsAllocated) { handle.Free(); } } -
Now that we have the prerequisites, let's add the method that will implement the example:
public static string RenderExample()
{
    IntPtr[] frames = new IntPtr[5];

    GCHandle cpLocationsHandle = GCHandle.Alloc(cpLocations, GCHandleType.Pinned);
    GCHandle cpColorsHandle = GCHandle.Alloc(cpColors, GCHandleType.Pinned);
    GCHandle lightPosHandle = GCHandle.Alloc(lightPos, GCHandleType.Pinned);
    GCHandle framesHandle = GCHandle.Alloc(frames, GCHandleType.Pinned);

    try
    {
        IntPtr cpLocationsPointer = cpLocationsHandle.AddrOfPinnedObject();
        IntPtr cpColorsPointer = cpColorsHandle.AddrOfPinnedObject();
        IntPtr lightPosPointer = lightPosHandle.AddrOfPinnedObject();
        IntPtr framesPointer = framesHandle.AddrOfPinnedObject();

        // Create a gradient

        // Generate the heightmap.

        // Compute ambient occlusion.

        // Create a normal map.

        // Create an albedo image.

        // Perform lighting.

        // Create the film strip image

        // Copy the final IntPtr data to a HemanImage struct

        // Cleanup
    }
    finally
    {
        FreeHandle(cpLocationsHandle);
        FreeHandle(cpColorsHandle);
        FreeHandle(lightPosHandle);
        FreeHandle(framesHandle);
    }
}
The main structure of this method creates the
IntPtrinstances for the arrays and ensures the associated handles are freed when the method is complete. Now let's look at each comment in turn - the C code and the C# version.
Create a gradient
-
The C code for this function is:
heman_image* grad = heman_color_create_gradient( 256, COUNT(cp_colors), cp_locations, cp_colors); -
Locate the
// Create a gradient commentand update it to:// Create a gradient var grad = NativeMethods.heman_color_create_gradient(256, cpColors.Length, cpLocationsPointer, cpColorsPointer);Notice the use of the
Lengthproperty of an array amd theIntPtrinstances created earlier.gradnow holds anIntPtrinstance that points to the location of the grad heman image.
Generate the heightmap
-
The C code for these functions is:
// Generate the heightmap. heman_image* hmap = heman_generate_island_heightmap(SIZE, SIZE, time(0)); heman_image* hmapviz = heman_ops_normalize_f32(hmap, -0.5, 0.5); -
Locate the
// Generate the heightmap.and update it to:// Generate the heightmap. var time = (DateTime.Now - new DateTime(1970, 1, 1, 0, 0, 0)).Seconds; var hmap = NativeMethods.heman_generate_island_heightmap(Size, Size, time); var hmapViz = NativeMethods.heman_ops_normalize_f32(hmap, -0.5f, 0.5f);Notice the introduction of the
timevariable - the Ctime(0)function returns the number of seconds since midnight 1/1/1970, so we need to do something similar.The
Sizeconstant is used to specify the width and height of the island height map.For the normalize function, we use the
fqualifier to ensure we are passingfloatvalues and pass thehmapvalue.As you can see, the code is very straightforward and follows the earlier pattern.
Implementing the next few parts
-
Locate the
// Compute ambient occlusion.comment and update it as follows:// Compute ambient occlusion. var occ = NativeMethods.heman_lighting_compute_occlusion(hmap); // Create a normal map. var norm = NativeMethods.heman_lighting_compute_normals(hmap); var normviz = NativeMethods.heman_ops_normalize_f32(norm, -1, 1); // Create an albedo image. var albedo = NativeMethods.heman_color_apply_gradient(hmap, -0.5f, 0.5f, grad); NativeMethods.heman_image_destroy(grad); // Perform lighting. var final = NativeMethods.heman_lighting_apply(hmap, albedo, 1, 1, 0.5f, lightPosPointer);This follows the same pattern, with the introduction of the
NativeMethods.heman_image_destroy)grad);which frees up memory used by thegradimage. -
Locate the
// Create film strip imagecomment and update it as follows:// Create film strip image frames[0] = NativeMethods.heman_color_from_grayscale(hmapViz); frames[1] = NativeMethods.heman_color_from_grayscale(occ); frames[2] = normviz; frames[3] = albedo; frames[4] = final; var filmstrip = NativeMethods.heman_ops_stitch_horizontal(framesPointer, frames.Length); var path = Path.GetTempPath(); var randomFilename = Path.GetRandomFileName(); var fileName = Path.Combine(path, randomFilename.Split('.')[0] + ".png"); NativeMethods.hut_write_image(fileName, filmstrip, 0f, 1f);The film strip image is constructed from 5 images. The
framesarray containsIntPtrinstances that locate each individual frame in memory. TheNativeMethods.heman_color_from_grayscalefunction makes a single channel greyscale image a 3 scale color image so that it can be added to the filmstrip.As the example saves the resultant film strip image out to a file, we generate a temporary filename and pass that to
NativeMethods.hut_write_image.
Marshalling an IntPtr to struct
Earlier I stated that as we aren't actually utilizing any of the heman_image structures returned by the functions, we could just use IntPtr instances to hold the return addresses and pass them into other functions. However, if you do want to get at the underlying structure, mechanisms exist to do so. Let's add one version:
-
Locate the
// Copy the final IntPtr data to a HemanImage structcomment and update it as follows:// Copy the final IntPtr data to a HemanImage struct var finalImage = Marshal.PtrToStructure<HemanImage>(final); var width = finalImage.Width;The
Marshal.PtrToStructure<HemanImage>(final)creates a new instance of theHemanImagestruct and then copies the data addressed by thefinalpointer to the struct. The size of theHemanImagestructure is used to determine how much data is copied from that address.You can debug and confirm the values are copied over.
Final Cleanup
-
Locate the
// Cleanupcomment and update it as follows:NativeMethods.heman_image_destroy(frames[0]); NativeMethods.heman_image_destroy(frames[1]); NativeMethods.heman_image_destroy(hmap); NativeMethods.heman_image_destroy(hmapViz); NativeMethods.heman_image_destroy(occ); NativeMethods.heman_image_destroy(norm); NativeMethods.heman_image_destroy(normviz); NativeMethods.heman_image_destroy(albedo); NativeMethods.heman_image_destroy(final); return fileName;Self-evidently, this code cleans up the remaining native memory addressed by the the
IntPtrinstances returned by the native methods.Finally, the filename is returned so the image can be used elsewhere.
At this point, you have an example that would save a PNG to your %TEMP% folder. We now need to add a UI to call this method and display the image.
Adding a UI
-
Open the
MainWindow.xamlfile and delete the existing<StackPanel>and its children. -
Add the following
<Grid>:<Grid x:Name="RootGrid"> <Grid.Resources> <ThemeShadow x:Name="SharedShadow" /> <Storyboard x:Name="HideStoryboard"> <FadeOutThemeAnimation Storyboard.TargetName="OutputImage" /> </Storyboard> <Storyboard x:Name="ShowStoryboard"> <FadeInThemeAnimation Storyboard.TargetName="OutputImage" /> </Storyboard> </Grid.Resources> <Grid.RowDefinitions> <RowDefinition Height="Auto" /> <RowDefinition /> </Grid.RowDefinitions> <!--Grid for shadow projection --> <!-- Button to launch image render --> <!-- Image to display rendered image --> </Image> </Grid>This grid has a number of resource defined:
- ThemeShadow - A ThemeShadow is a preconfigured shadow effect that can be applied to any XAML element to draw shadows appropriately based on x, y, z coordinates. It is a good practice to define a single shadow resource and re-used on many UI elements.
- Two storyboards, HideStoryboard and ShowStoryboard that utilize the FadeInThemeAnimation and FadeOutThemeAnimation animations so that the rendered images appear in a more pleasing manner.
The grid is defined with two rows - the first will hold a button to execute the image render, the second will hold the image control.
-
Locate the
<!--Grid for shadow projection -->comment and update it as follows:<Grid x:Name="BackgroundGrid" Background="{StaticResource ApplicationPageBackgroundThemeBrush}" Grid.RowSpan="2"/>In order to utilize the
ThemeShadowthere must be an element on which the shadows can be rendered. This element cannot be the parent of any of the controls that are projecting shadows. Note that therowspanis set to both rows. -
Locate the
<!-- Button to launch image render -->comment and update it as follows:<!-- Button to launch image render --> <Button Margin="4" Click="ThreadButtonClick">Render the Example</Button>Nothing fancy here - no use of
x:Bind, etc. just a simple click event that will be handled in the code-behind. Of course, you could utilize MVVM and click-binding, or a command, if you so chose. -
Locate the
<!-- Image to display rendered image -->comment and update the code as follows:<!-- Image to display rendered image --> <Image Grid.Row="1" Margin="24" x:Name="OutputImage" Visibility="Collapsed" Shadow="{StaticResource SharedShadow}" Translation="0,0,200" />Notice the use of the SharedShadow resource to set a shadow for the image, as well as the translation - the Z value of 200 determines how "high" the image control is above the underlying element (BackgroundGrid) and so influences the size of the cast shadow. Also note the control has
Visibility="Collapsed"- this is due to the fact that an empty control of zero size still results in a shadow being cast, which looks wrong: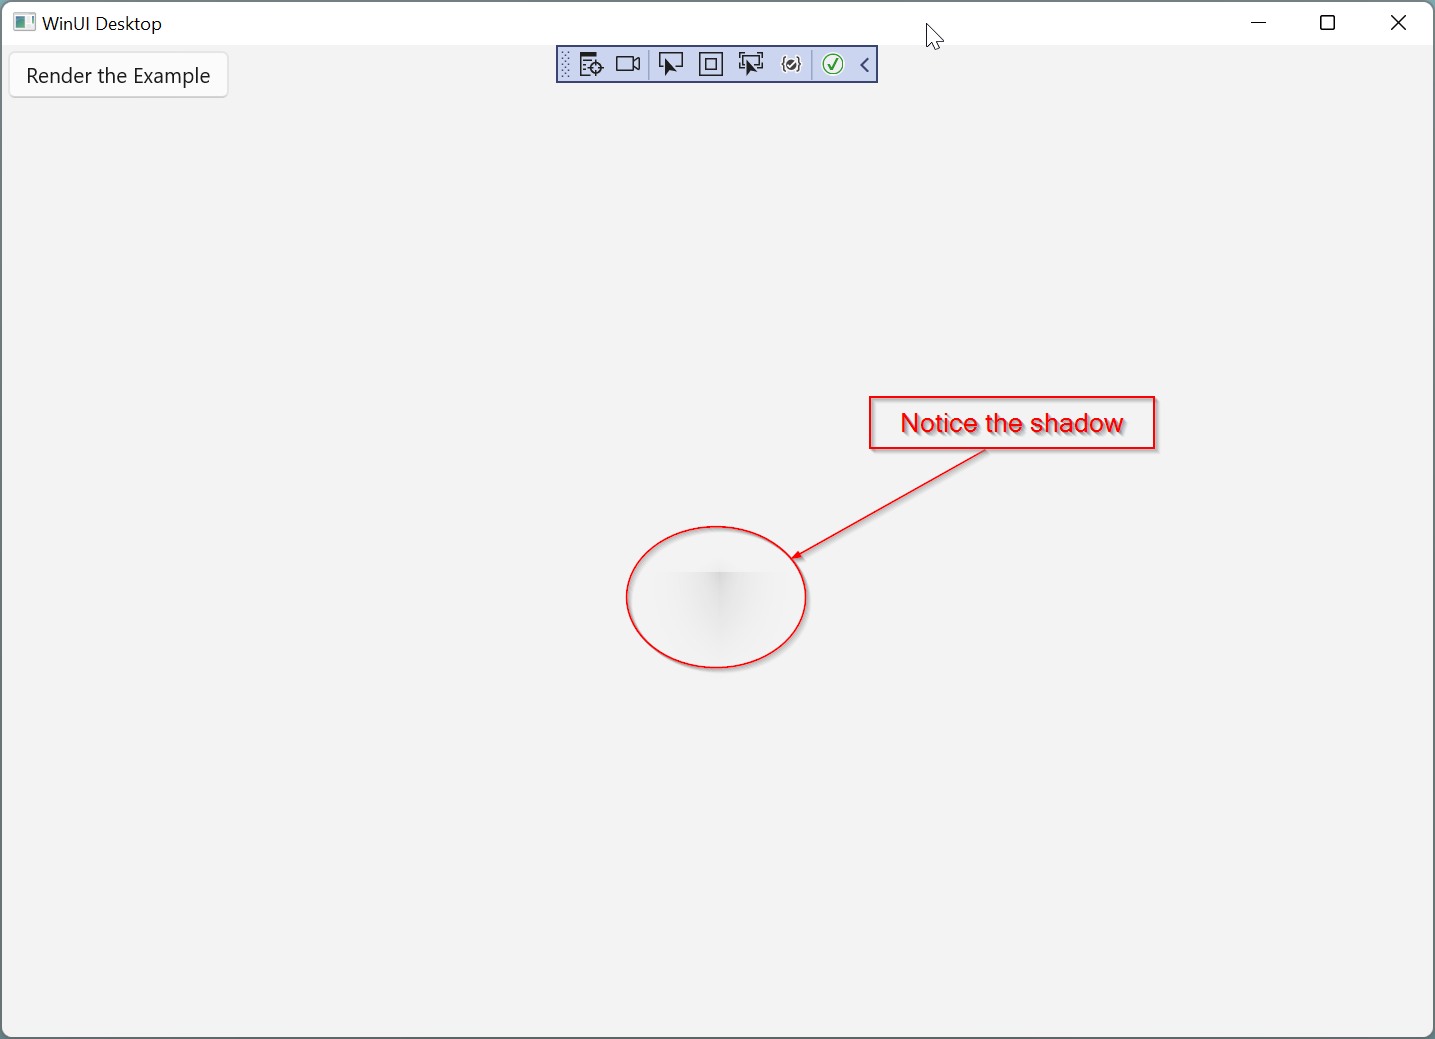
Implementing the code-behind
-
Open the MainWindow.xaml.cs file. Delete the click handler from part 1 so that the code looks similar to:
using Microsoft.UI.Xaml; using Microsoft.UI.Xaml.Media.Imaging; using System; using System.IO; using System.Threading.Tasks; using Windows.Storage; namespace HemanWinUI { public sealed partial class MainWindow : Window { public MainWindow() { this.InitializeComponent(); } } } -
Add a method that handles the button click event:
private async void ThreadButtonClick(object sender, RoutedEventArgs e)
{
    HideStoryboard.Begin();
    await Task.Delay(1);

    var fileName = HemanApi.RenderExample();
    await LoadImage(fileName);

    ShowStoryboard.Begin();
}
Notice the method is marked async - the image load code (added next) runs asynchronously and we want to launch the animations immediately, which is what the
await Task.Delay(1);code achieves (try running it without).First thing the method does is launch the hide animation - redundant on the first run, but fades out the last image is displayed.
Next, the example we created earlier is run and the filename returned. We await the load of the image, and then launch the storyboard that fades in the new image.
-
Add a method that loads the image from a filename:
private async Task LoadImage(string fileName)
{
    var file = await StorageFile.GetFileFromPathAsync(fileName);
    using var fileStream = await WindowsRuntimeStorageExtensions.OpenStreamForReadAsync(file);
    BitmapImage bitmapImage = new();
    await bitmapImage.SetSourceAsync(fileStream.AsRandomAccessStream());
    OutputImage.Source = bitmapImage;
    if (OutputImage.Visibility != Visibility.Visible)
    {
        OutputImage.Visibility = Visibility.Visible;
    }
}
This code uses the
StorageFileclass to open a stream to read the file, create a newBitmapImageto use as the source for theImageelement. It also makes theImagecontrol visible if it is still collapsed.
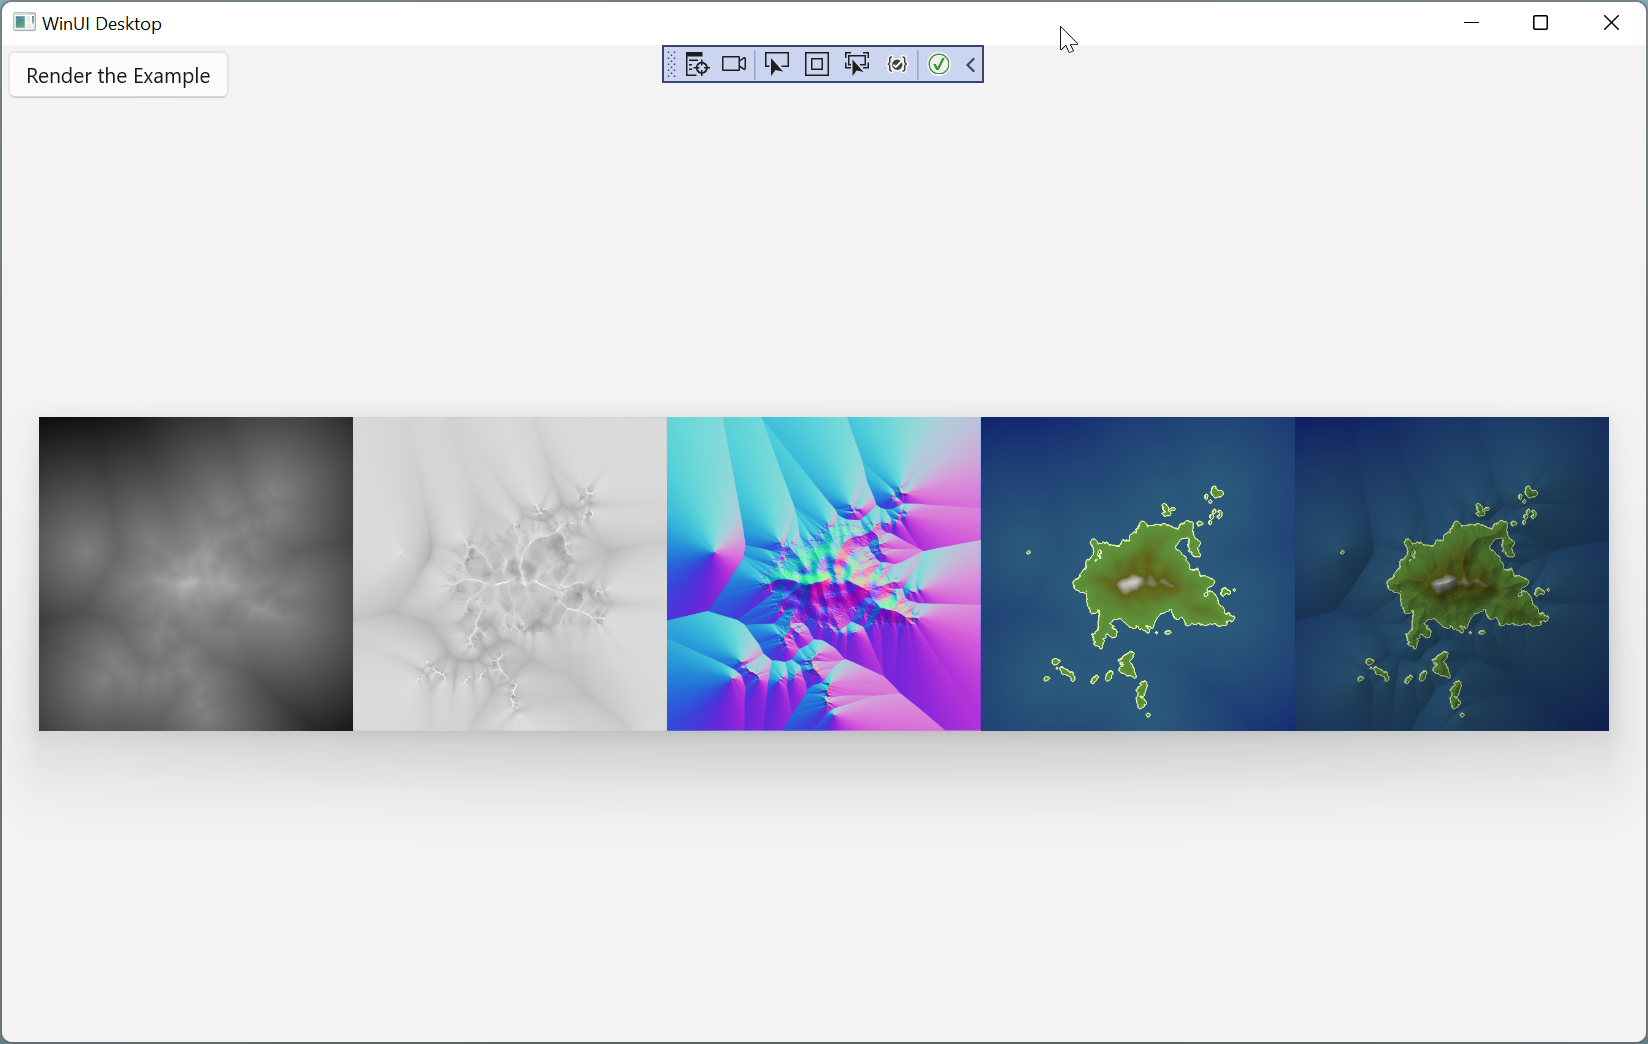
And that's it - the app should now launch and render the height maps from the heman api. Click the button again to create a new fantasy island:
Wrap up
In this tutorial I complete the WinApp started early and showed my approach to implementing a native dll in a WinApp. I also showed how shadows and animations can be easily added to the app.
My next post will explore interacting with Win32 APIs.
The source code for the WinApp can be found here: HemanWinUI Part 2.